Contact Us Live Chat or 1-888-726-6993
My Garage
My Account
Cart
Make sure this part fits

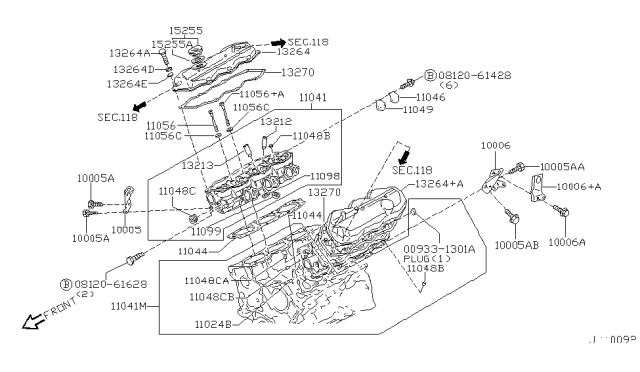
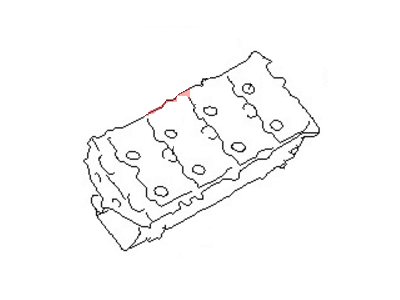
Nissan 11090-1W200 Head Assembly-Cylinder,L

1996-2004 Nissan 110901W200

Customer Questions & Expert Answers (23)
Nissan 11090-1W200 Head Assembly-Cylinder,L
  • Part Description
    Head Assy-Cylinder,LH
  • Lookup Code
    11041M
  • Position
    Driver side
  • Replaces
    11090-0W000
  • Manufacturer
    Nissan
  • Manufacturer's Notes
    This part is discontinued.
Make sure this part fits
  • Related Parts
  • Product Specifications
  • Vehicle Fitment
  • Customer Questions & Expert Answers
  • Product Specifications

    BrandGenuine Nissan
    Lookup Code11041M
    Manufacturer Part Number11090-1W200
    Part DescriptionHead Assy-Cylinder,LH
    Other NamesCylinder Head
    Item Dimensions18.2 x 9.1 x 7.3 inches
    Item Weight10.20 Pounds
    PositionDriver side
    ConditionNew
    Fitment TypeDirect Replacement
    Replaces11090-0W000
    ManufacturerNissan
    SKU11090-1W200
    WarrantyThis genuine Nissan part is guaranteed by Nissan's factory warranty.
    Shipping & ReturnShipping Policy Return Policy
    Warning: California’s Proposition 65
  • Vehicle Fitment

    Year Make Model Trim & Engine Important vehicle option details
    1998-2004 Nissan FrontierSC, SE, XE|6 Cyl 3.3LVG33E
    1996-2003 Nissan PathfinderLE, SE, XE|6 Cyl 3.3LVG33E
    1999-2003 Nissan QuestGXE, SE|6 Cyl 3.3LVG33E
    2000-2004 Nissan XterraSE, XE|6 Cyl 3.3LVG33E, VG33ER
  • Customer Questions & Expert Answers

    Q:
    Will this part fit my car? Posted by NissanPartsDeal Specialist
    A:
    You can Select Your Vehicle to check if 11090-1W200 fits your vehicle.
    Posted by NissanPartsDeal Specialist
    Q:
    What steps should be taken for thorough cleaning and inspection of cylinder heads and valve train components during an engine overhaul on Nissan Quest? Posted by Customer
    A:
    The cylinder heads as well as other components that are relevant to the valve train must be cleaned and then examined to determine the required valve service work in the process of overhauling the engine. Remove all the remnants of the old gasket material and any sealing compound off the cylinder head gasket, intake manifold, and exhaust manifold surfaces avoiding damaging the cylinder head. Scrape off the deposit from the coolant passages and scrub the numerous holes with a brass bristle. Insert an appropriate-size tap into each threaded hole to counter-bore the corrosion and thread sealant and use compressed air to blow dirt wearing goggles. Scrub the combustion chambers with a brass wire brush and solvent if carbon has settled and wash the cylinder head with solvent and dry it with an air compressor. Lubricate 280 rocker arms and shafts using solvent provided and it is important not to confuse the left and right units, and same with all the valve springs, spring seats, valve stem locks and retainers always do them one at a time. Clean a heavy deposits on the valves by scraping and for the head and stems use a motorized form wire brush that maintains and organizes the valves. Check the heads for cracks, leaks and other major or minor defects, advise the automotive machine shop if needed. Ensure that the cylinder head gasket mating surface is flat by placing a straightedge, in combination with a feeler gauge and observe the valve seats for signs of pitting, cracking or signs of burning. Gauge valve stem to guide clearance with a small hole gauge and take micrometer readings to the guide to ensure that it is not worn out. Visually check all the valve faces to verify if there are signs of wear, deformation or cracks, and check the margin width of each valve and replace those that do not conform to set standards. Inspect check valve springs for wear etc for free length check to see that it is suitable for reuse and inspect spring retainers, valve stem locks for wear and crack etc and replace any suspected parts. If there are scars or excessive wear them, they have to be replaced, and if the valve elements are worn, disassemble the valves in the cylinder head for further service suggestions.
    Posted by NissanPartsDeal Specialist
    Q:
    How do you remove the cylinder head on 3.3L V6 Nissan Xterra? Posted by Customer
    A:
    To begin with, you should release the pressure from the fuel system and remove the cylinder head. Following this, drain the coolant, and get rid of spark plug wires, distributor cap and spark plug wires as an assembly. After that, remove the intake manifold, camshaft sprocket, timing belt and rear timing belt cover. Then take away rocker arm components, lifters and exhaust manifold. Additionally disconnect hoses as well as electrical harness connectors including coolant pipes. Besides these, there is also need to remove air conditioning compressor, power steering pump and alternator. Also eliminate compressor bracket, power steering pump bracket together with alternator bracket. The distributor should be removed before releasing the cylinder head bolts finally. Be cautious when lifting off the cylinder head from the engine block in order not to spoil it! In order to install a new cylinder head; first of all remove old gaskets and make sure that both surfaces are thoroughly cleaned up using laquer thinner or acetone alongside a gasket scraper for that matter; if any damage is observed on them simply file or machine out if need be such as with damaged threads in cylinder head bolt holes that ought to be chased only after ensuring they are free of any dirt or grease therein before eventually placing new gaskets over dowel pins and carefully putting down heads on engine block; installation steps for intake manifold are completed by adding more fluids then oiling around threads for cylinder head bolts using recommended torque values in tightening them one at a time beginning from small bolt on outside section of its opposite side until drilling last hole followed by tightening bigger ones first prior to completing remaining installation steps in reverse order through addition of some coolants plus altering engine oil including filter alongside leakage inspection or rather check ups.
    Posted by NissanPartsDeal Specialist
    Q:
    How to disassemble and inspect cylinder heads on Nissan Frontier? Posted by Customer
    A:
    Dealerships and auto parts stores often have new or remanufactured cylinder heads for most engines. Some specialized tools are necessary for the disassembly and Inspection procedures, and replacement parts may be scarce leading to it being more practical for a home mechanic to buy replacement heads instead of disassembling, inspecting and reconditioning the original ones. Intake and exhaust valves as well as related components should be taken off during cylinder head disassembly. If they're still in place, remove the rocker arms (3.3L only) and the lifters and camshafts from the cylinder head. Parts should be labeled or stored separately so that they can be properly reinstalled in their initial areas. Don't put down 3.3L engines on their sides or upside down, while laying down lifters because the lifter would airlock thus requiring bleeding. The lifters can only be placed on their side provided they are submerged in a pan of clean engine oil until reassembly takes place. Before removing valves ensure that all their related components along with them are labelled so that they can remain separate and reinstall them into the valve guides where they were removed from. Use a spring compressor to compress the springs on the first valve after which remove valve stem keepers from it. Be careful when releasing the valve spring compressor so as to avoid damaging anything else like retaining clips, springs, seats etcetera (if used). Take out one of valves from its engine head then get rid of oil seal from guide as well. If a valve binds in its guide (won't pull through), push it back into the engine head then deburr around this valve's stem keeper groove using fine file or whetstone tool. Repeat this process with other valves too. Ensure you keep all parts pertaining to each particular valve together such that when reinstalling happens, each will return to its original location. Once all valves are taken out, and their related components kept in an organized way, the whole head must be washed and examined. If you are performing a complete engine overhaul, finish the engine teardown before starting the cylinder head cleaning and inspecting process.
    Posted by NissanPartsDeal Specialist
    Q:
    How can a valve that binds in the guide be addressed for the 1997 Nissan Pathfinder? Posted by Customer
    A:
    If a valve binds in the guide and won't pull through, it should be pushed back into the cylinder head and the area around the valve stem keeper groove should be deburred with a fine file or whetstone.
    Posted by NissanPartsDeal Specialist
    See expert answers on similar Cylinder Head
    Q:
    How should the valve seals be tapped into their designated positions during installation for the 2003 Nissan Pathfinder? Posted by Customer
    A:
    During installation, gently tap each valve seal into its designated position to the specified depth, exercising caution to avoid damaging the seals or twisting them.
    Posted by NissanPartsDeal Specialist
    Q:
    How should the new gaskets and cylinder heads be positioned for the 1994 Nissan Quest? Posted by Customer
    A:
    Position the new gaskets over the dowel pins in the engine block, carefully place the heads on the engine block without disturbing the gaskets, and lightly oil the threads of the new cylinder head bolts before installing them in the proper locations.
    Posted by NissanPartsDeal Specialist
    Q:
    How should the reassembly process begin after cleaning and inspection for the 2001 Nissan Pathfinder? Posted by Customer
    A:
    Install the removed components, position the new cylinder head gasket, and apply clean engine oil to the cylinder head bolt threads and hardened washers before tightening the bolts in the recommended sequence. Reinstall the lifters, shims, and camshafts, adjusting valve clearances if necessary due to prior machine work on the cylinder head.
    Posted by NissanPartsDeal Specialist
    Q:
    How should the hydraulic valve lifters and other components be installed for the 1997 Nissan Quest? Posted by Customer
    A:
    The hydraulic valve lifters, lifter guide assembly, and rocker arms can now be installed on each cylinder head, ensuring the valve lifters are placed in their original lifter bores and held in place with rubber bands during the lifter guide assembly installation.
    Posted by NissanPartsDeal Specialist
    Q:
    How do I remove the cylinder head bolts for the 1998 Nissan Pathfinder? Posted by Customer
    A:
    Loosen the cylinder head bolts in 1/4-turn increments until they can be removed by hand, then lift the cylinder head off the engine block.
    Posted by NissanPartsDeal Specialist
    Q:
    How should the squareness of each valve spring be confirmed for the 1998 Nissan Pathfinder? Posted by Customer
    A:
    Confirm the squareness of each valve spring and replace any distorted or sagged springs.
    Posted by NissanPartsDeal Specialist
    Q:
    What should be done if the valve binds during removal for the 1994 Nissan Quest? Posted by Customer
    A:
    If the valve binds, the area around the valve stem lock groove should be deburred.
    Posted by NissanPartsDeal Specialist
    Q:
    What is the next phase after the cleaning process, and what should be thoroughly inspected for the 2002 Nissan Xterra? Posted by Customer
    A:
    The next phase is the inspection phase, which should be completed thoroughly before considering machine shop work. A meticulous inspection of the cylinder head is required to detect cracks, signs of coolant leakage, and other forms of damage.
    Posted by NissanPartsDeal Specialist
    Q:
    What should be done with the cylinder head bolts during installation for the 1996 Nissan Pathfinder? Posted by Customer
    A:
    Lightly oil the threads of the cylinder head bolts and install them, making sure the washers are in place correctly. Follow the recommended sequence to tighten the bolts to the specified torque. Tighten the small bolt on the outside of the cylinder head.
    Posted by NissanPartsDeal Specialist
    Q:
    What is the first step before commencing the reassembly of the cylinder head for the 2004 Nissan Xterra? Posted by Customer
    A:
    Before commencing the reassembly of the cylinder head, it is essential to ensure that the cylinder head is thoroughly clean, regardless of whether it underwent valve servicing at an automotive repair shop.
    Posted by NissanPartsDeal Specialist
    Q:
    How do I remove the cylinder head bolts for the 2000 Nissan Frontier? Posted by Customer
    A:
    Loosen the cylinder head bolts in 1/4-turn increments until they can be removed by hand, then lift the cylinder head off the engine block.
    Posted by NissanPartsDeal Specialist
    Q:
    What should be done before lifting the cylinder head off the engine block for the 1998 Nissan Frontier? Posted by Customer
    A:
    Loosen the cylinder head bolts.
    Posted by NissanPartsDeal Specialist
    Q:
    How should the lifters on the 2003 Nissan Xterra be stored during disassembly? Posted by Customer
    A:
    The lifters on 3.3L engines should not be laid on their side or upside down. If they need to be laid on their side, they should be submerged in a pan of clean engine oil until reassembly.
    Posted by NissanPartsDeal Specialist
    Q:
    What is the procedure for removing the idler sprocket for the 2000 Nissan Xterra? Posted by Customer
    A:
    Carefully make reference marks on the lower timing chain and the idler sprocket, then remove the idler sprocket bolt while ensuring the idler gear and lower timing chain remain engaged and rest on the timing chain wedge.
    Posted by NissanPartsDeal Specialist
    Q:
    What is the procedure for removing the idler sprocket for the 1998 Nissan Frontier? Posted by Customer
    A:
    Carefully make reference marks on the lower timing chain and the idler sprocket, then remove the idler sprocket bolt while ensuring the idler gear and lower timing chain remain engaged and rest on the timing chain wedge.
    Posted by NissanPartsDeal Specialist
    Q:
    What should I remove after the timing components for the 2002 Nissan Xterra? Posted by Customer
    A:
    After the timing components, remove the lower intake manifold and the exhaust manifolds, followed by the camshafts and lifters from the cylinder head. Label and remove any remaining items attached to the cylinder head.
    Posted by NissanPartsDeal Specialist
    Q:
    What is emphasized regarding the reinstallation of old cylinder head components for the 2001 Nissan Frontier? Posted by Customer
    A:
    When reassembling the cylinder head, it is emphasized to reinstate old cylinder head components in their original locations.
    Posted by NissanPartsDeal Specialist
    Q:
    How should valve stem-to-guide clearance be measured, and what action should be taken if it exceeds specific limits for the 2000 Nissan Frontier? Posted by Customer
    A:
    Valve stem-to-guide clearance should be measured with the appropriate tools. If it exceeds specific limits, consider replacing valve guides. When in doubt, consult an automotive machine shop for further evaluation.
    Posted by NissanPartsDeal Specialist
    If you have any questions about this product, please don't hesitate to ask us. We will be happy to help you!

Genuine Nissan Part 11090-1W200, the Right Choice

To ensure reliability, purchase Nissan part # 11090-1W200 Head Assembly-Cylinder,L. It is sometimes referred to as Nissan Cylinder Head. OEM parts are the #1 choice in terms of quality. Crafted by Nissan, they follow rigorous factory specs and go through the demanding quality control processes during manufacturing. This part fits 1998-2004 Nissan Frontier, 1996-2003 Nissan Pathfinder, 1999-2003 Nissan Quest, 2000-2004 Nissan Xterra.

NissanPartsDeal.com is a leading supplier of genuine Nissan parts and accessories such as Nissan 110901W200 Head Assembly-Cylinder,L. Welcome to our vast selection of competitively-priced genuine Nissan parts available online. Each OEM Nissan part we provide is backed by a manufacturer's warranty and is subject to a stress-free return policy. Place your order now and receive your parts quickly, shipped directly to your doorstep.

Why choose Nissan Parts Deal

  • Dedicated Service

    Your complete satisfaction is our #1 goal

  • Lowest Prices

    Best deals on genuine OE parts from dealerships

  • Fast Delivery

    Orders are processed and delivered promptly