Contact Us: Live Chat or 1-888-726-6993
My Garage
My Account
My Cart
Make sure this part fits your vehicle

Nissan A2010-8Z310 Piston W/PIN

2002-2004 Nissan A20108Z310

Nissan A2010-8Z310 Piston W/PIN
  • Part Description
    Piston-W/Pin
  • Lookup Code
    12010
  • Replaced By
    A2010-8Z30A
  • Manufacturer
    Nissan
Customer Questions & Answers
$68.10 MSRP: $90.80
You Save: $22.70 (25%)
1
ADD TO CART
Ships in 1-3 Business Days
  • Product Specifications

    BrandGenuine Nissan
    Lookup Code12010
    Manufacturer Part NumberA2010-8Z310
    Part DescriptionPiston-W/Pin
    Item Dimensions4.8 x 4.6 x 4.7 inches
    Item Weight1.50 Pounds
    ConditionNew
    Fitment TypeDirect Replacement
    Require Quantity4
    ManufacturerNissan
    SKUA2010-8Z310
    WarrantyThis genuine Nissan part is guaranteed by Nissan's factory warranty.
    Shipping & ReturnShipping Policy Return Policy
    Warning: California’s Proposition 65
  • Vehicle Fitment

    Year Make Model Trim & Engine Important vehicle option details
    2002-2004 Nissan FrontierXE|4 Cyl 2.4LKA24DE
    2002-2004 Nissan XterraXE|4 Cyl 2.4LKA24DE

Customer Questions & Answers

Q:
Does this part fit my vehicle? Posted by NissanPartsDeal Specialist
A:
You can Select Your Vehicle to check if A2010-8Z310 fits your vehicle.
Posted by NissanPartsDeal Specialist
Q:
How to install piston/connect rod assemblies on Nissan Frontier? Posted by Customer
A:
So, before you start putting the piston/rod assemblies in place, make sure that cylinder walls are clean enough, the top edges of all cylinders are chamfered and the crankshaft is installed. First, take off the cap at the end of number one connecting rod. Just get rid of old bearing inserts and thoroughly clean both rod and cap bearing surfaces with a soft cloth that is perfectly clean and free from fluff. Clean the backside of upper insert that's new for connecting rod bearing oil clearance check, fit it into the rod ensuring its tab aligns with hole at recess backside. Do this for another insert and the rod cap, taking good care to protect their faces from any oil or dirt contamination. Carefully place the piston rings as specified around the piston and lubricate them with fresh engine oil. Affix a piston ring compressor to hold compression as you guide it into position in the cylinder with skirt sticking out slightly. Rotate crankshaft until number one connecting rod journal reaches bottom dead center (BDC) and then apply oil on cylinder walls. The notch in pistons should face toward other end of engine behind belt or chain drive when inserting piston/connecting rod assembly into number one cylinder bore using gentle tapping motion onto crankshaft journal. Always keep rings compressed during this process; do not force piston if it is stubborn going through dead center. Finally, there should be a similar examination for connecting rod bearing oil clearance by placing Plastigage on number one connecting rod journal then installing rod cap without disturbing Plastigage in case something goes wrong because Plastigage has been removed carefully without harm to any part of the engine or other components involved in its operation which will require complete overhaul sooner rather than later due to failure caused by lack maintenance practices depending on how long it took since last service was done but sometimes engineers can make mistakes even unintentionally such as leaving some leftover material inside their cars after assembling them hence leading catastrophic consequences if not attended time by qualified technicians. As you tighten nuts, use a lightweight socket and do not turn the crankshaft. Gently unfasten rod cap verifying oil clearance matches given specifications with reference to width of crushed Plastigage as seen on envelope. Otherwise, check out various bearing inserts after confirming cleanliness and journal diameter. Remove all Plastigage material then apply clean moly-base grease/ engine assembly lube to bearing faces and reinstall rod cap. Repeat the same process for the other pistons/connecting rods ensuring cleanliness, correct assembly, correct "W" mark position and lubrication as required. Hand-rotate the crankshaft after all these assemblies have been installed for binding purposes. Finally, check connecting rod endplay against specifications and take necessary steps if endplay is wrong such as resizing or replacing rods should be done when it is not sufficient/excessive according to allowable range specified in given service manual by manufacturer of your particular vehicle/motorcycle model which can be obtained through authorized dealerships or directly from their websites depending on where you reside within continental United States (CONUS).
Posted by NissanPartsDeal Specialist
Q:
How should you remove the original piston rings from the piston/connecting rod assemblies for the 2004 Nissan Xterra? Posted by Customer
A:
You should use a piston ring installation tool to carefully remove the original piston rings from the piston/connecting rod assemblies, taking care not to damage the pistons in the process.
Posted by NissanPartsDeal Specialist
Q:
How should the piston be inserted into the cylinder bore for the 2000 Nissan Xterra? Posted by Customer
A:
The piston should be inserted into the cylinder bore using a piston ring compressor, leaving the skirt protruding slightly to guide it into the cylinder.
Posted by NissanPartsDeal Specialist
Q:
What should be checked before removing the connecting rods for the 2004 Nissan Frontier? Posted by Customer
A:
The side clearance (endplay) should be checked using feeler gauges.
Posted by NissanPartsDeal Specialist
Q:
What should be done if ridges are found due to carbon deposits or cylinder wear for the 2003 Nissan Xterra? Posted by Customer
A:
They must be completely removed with a special tool.
Posted by NissanPartsDeal Specialist
See expert answers on similar Piston
Q:
What is the recommended method for cleaning carbon deposits on the piston tops for the 2001 Nissan Frontier? Posted by Customer
A:
Carbon deposits on the piston tops should be scraped off, and further cleaning can be done using a hand-held brass wire brush or fine emery cloth with solvent. Avoid using a wire brush mounted in a drill motor, as it may erode the soft piston material.
Posted by NissanPartsDeal Specialist
If you have any questions about this product, please don't hesitate to ask us. We will be happy to help you!

Genuine Nissan Part A2010-8Z310, the Right Choice

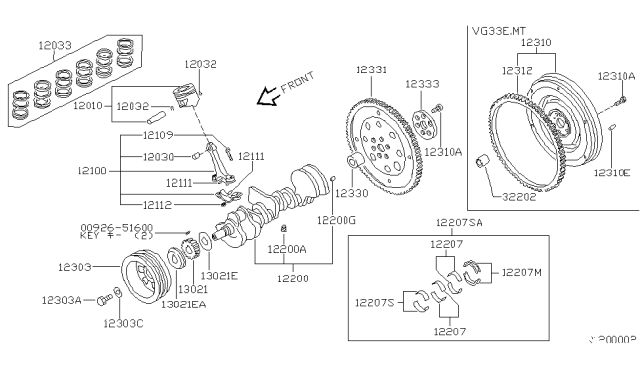
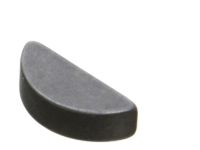
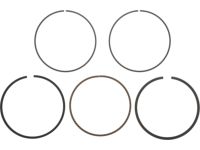
To ensure reliability, purchase Nissan part # A2010-8Z310 Piston W/PIN. It is sometimes referred to as Nissan Piston. OEM parts are the #1 choice in terms of quality. Crafted by Nissan, they follow rigorous factory specs and go through the demanding quality control processes during manufacturing. This part fits 2002-2004 Nissan Frontier, 2002-2004 Nissan Xterra.

NissanPartsDeal.com is a leading supplier of genuine Nissan parts and accessories such as Nissan A20108Z310 Piston W/PIN. Welcome to our vast selection of competitively-priced genuine Nissan parts available online. Each OEM Nissan part we provide is backed by a manufacturer's warranty and is subject to a stress-free return policy. Place your order now and receive your parts quickly, shipped directly to your doorstep.

Why choose Nissan Parts Deal

  • Dedicated Service

    Your complete satisfaction is our #1 goal

  • Lowest Prices

    Best deals on genuine OE parts from dealerships

  • Fast Delivery

    Orders are processed and delivered promptly