My Garage
Cart
Make sure this part fits

Nissan 13020-8J101 Camshaft Assembly

2001-2010 Nissan 130208J101

Customer Questions & Expert Answers (4)
13020-8J101 Nissan Camshaft Assembly Product Photo 1 of 1
  • Part Description
    Camshaft Assy. This item is non-returnable.
  • Lookup Code
    13020
  • Position
    Passenger Side
  • Manufacturer
    Nissan
Make sure this part fits
$391.78 MSRP: $579.27
You Save: $187.49 (33%)
Ships in 1-2 Business Days
1
ADD TO CART
  • Related Parts
  • Product Specifications
  • Vehicle Fitment
  • Customer Questions & Expert Answers
  • Product Specifications

    BrandGenuine Nissan
    Lookup Code13020
    Manufacturer Part Number13020-8J101
    Part DescriptionCamshaft Assy. This item is non-returnable.
    Other NamesCamshaft
    Manufacturer NoteINT
    Item Dimensions2.6 x 2.7 x 19.2 inches
    Item Weight3.30 Pounds
    PositionPassenger Side
    ConditionNew
    Fitment TypeDirect Replacement
    ManufacturerNissan
    SKU13020-8J101
    Shipping & ReturnShipping Policy Return Policy
    Warning: California's Proposition 65
  • Vehicle Fitment

    Year Make Model Trim & Engine Important vehicle option details
    2003-2007 Nissan 350ZBase, Enthusiast, GT, Touring|6 Cyl 3.5LVQ35DE
    2002-2006 Nissan AltimaSE, SE-R, SL|6 Cyl 3.5LVQ35DE
    2001-2008 Nissan MaximaGLE, GXEL, SE, SEL, SES, SL|6 Cyl 3.5LVQ35DE
    2003-2007 Nissan MuranoS, SE, SL|6 Cyl 3.5LVQ35DE
    2004-2010 Nissan QuestBase, S, SE, SL|6 Cyl 3.5LVQ35DE
  • Customer Questions & Expert Answers

    Q:
    Will this part fit my car? Posted by NissanPartsDeal Specialist
    A:
    You can Select Your Vehicle to check if 13020-8J101 fits your vehicle.
    Posted by NissanPartsDeal Specialist
    Q:
    How to remove and install the camshaft and Lash Adjuster on Nissan 350Z? Posted by Customer
    A:
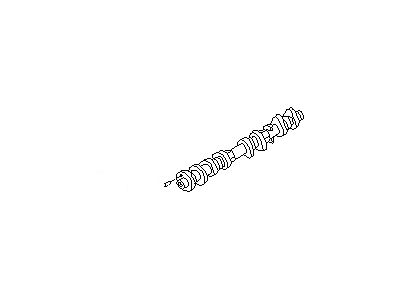
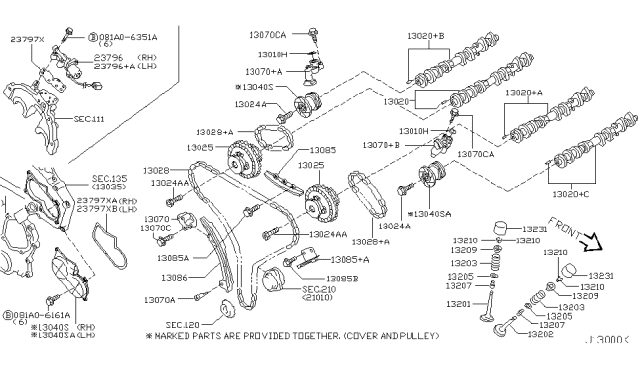
    To remove the components, first disconnect the cable from the negative terminal of the battery. Next, remove the intake plenum and the valve covers, then disconnect the electrical connectors at the camshaft position sensors and remove the sensors. Proceed to remove the timing chains and camshaft sprockets, and for models without exhaust timing control, remove the variable intake valve timing valves from the top of the number one camshaft journals. Mark the camshaft bearing caps from 1 to 4, indicating intake or exhaust, and ensure arrows point to the front of the engine. Loosen the camshaft bearing caps in reverse order of tightening, keeping them in order for reinstallation. Remove the bearing caps and camshafts, noting the markings for correct installation. Remove the Lash Adjusters from the cylinder head, keeping track of their original positions, and measure each journal diameter with a micrometer, replacing the camshaft if any journal is below the specified limit. Visually inspect the camshaft lobes, journals, bearing caps, and Lash Adjusters for wear or damage, and measure camshaft journal diameter and lobe height, replacing the camshaft if any measurements are below specifications. Check camshaft runout and endplay, replacing the camshaft or cylinder head if limits are exceeded. Inspect each Lash Adjuster for scuffing and check oil clearance for each camshaft journal using Plastigage, replacing components if clearance is greater than specified. For installation, remove old RTV sealant, set the number one piston at TDC, lubricate and install the Lash Adjusters, apply assembly lubricant to the camshaft lobes and journals, and install the exhaust camshafts with dowel pins facing up. Apply RTV sealant to the sealing surfaces and install new O-rings on the secondary timing chain tensioners. Install the bearing caps and bolts, tightening them in sequence, and check the protrusion of the front bearing caps. Install the camshaft sprockets and timing chain, holding the camshafts with a wrench while tightening the sprocket bolts. Complete the installation in reverse order of removal, checking and adjusting valve clearance if any part of the valve train was replaced, and finally reconnect the battery and perform necessary relearn procedures, especially for specific models if the Exhaust Valve Timing components were disconnected or removed.
    Posted by NissanPartsDeal Specialist
    Q:
    How to inspect and measure the camshaft and lash adjuster on the Nissan Maxima? Posted by Customer
    A:
    Visually check the camshaft bearing surfaces for pitting, score marks, galling, and abnormal wear; if damaged, the cylinder head must be replaced. Measure the outside diameter of each camshaft bearing journal and record the measurements, then measure the inside diameter of each corresponding camshaft bearing. Subtract each cam journal outside diameter from its respective cam bearing bore inside diameter to determine the oil clearance for each bearing and compare the results to the specified journal-to-bearing clearance; if any measurements fall outside the standard wear limits, either the camshaft or the cylinder head, or both, must be replaced. Check camshaft runout by placing the camshaft between two V-blocks or back into the cylinder head, setting up a dial indicator on the center journal, zeroing it, and turning the camshaft slowly while noting the readings; if the measured runout exceeds the specified limit, replace the camshaft. Measure each cam lobe height with a micrometer, compare it to the specified height, and compute wear by subtracting the measured height from the specified height; if the wear exceeds the limit, replace the camshaft. Inspect the contact and sliding surfaces of each Lash Adjuster for wear and scratches, noting that if the Lash Adjuster pad is worn, the corresponding camshaft lobe or adjusting shim should also be checked. On SOHC engines, do not lay the Lash Adjusters on their side or upside down to avoid trapping air; they can only be laid on their side if submerged in clean engine oil until reassembly. Measure the outside diameter of each Lash Adjuster with a micrometer and compare it to the specifications; replace any Lash Adjuster worn beyond the limit. Check each Lash Adjuster bore diameter and compare the results to the specifications; if any bore is worn beyond the limit, the Lash Adjuster guide assembly or the cylinder head must be replaced. Subtract the outside diameter of each Lash Adjuster from the inside diameter of the Lash Adjuster bore and compare the difference to the specified clearance; if both the Lash Adjuster and bore are within acceptable limits, this measurement should also fall within tolerance, but new parts may affect this. On SOHC engines, inspect the rocker arms and shafts; if the pads are worn, replace the rocker arms without attempting to restore them by grinding. Ensure all parts, whether new or old, have been thoroughly inspected before reassembly.
    Posted by NissanPartsDeal Specialist
    Q:
    Should the camshaft and lash adjuster be thoroughly inspected before installation on Nissan Murano? Posted by Customer
    A:
    Camshafts and Lash Adjusters should be examined before being used and the endplay of the camshafts should be measured before removing the cams. Start with the removal of the timing chains and the camshaft sprockets; afterward, remove the camshaft position sensor brackets from the drivers' ends of the cylinder heads. Identify each camshaft so that they can be reinstalled in their proper location; on the camshaft bearing caps, place the number 1, 2, 3, and 4, also note whether it is an intake or exhaust cam with an "I" or "E," and arrows facing forward. Unfasten the camshaft bearing caps vice versa, yet make sure that they are properly arranged to be refastened back. Bearing caps and camshafts should be removed at this time and the marks made at this time noted for replacement. The intake camshaft will have a drill spot, having to do with the side of the sprocket mounting flange. Thoroughly pull out all the Lash Adjusters from the cylinder head, and make sure that they are properly arranged. Check the camshaft for wear or damage on the lobe, journals, bearing caps, and Lash Adjusters. Camshaft journal diameter may also be checked with a micrometer and also the lobe height, and if they do not tally with the standard ones, then they are replaced. Verify the run out and end play of the camshaft and replace the camshaft or the cylinder head if there is a need for that. For each Lash Adjuster, look for scuffing and the presence of score marks, and check the Plastigage oil clearance for each camshaft journal to replace the component if it exceeds the specs. Scrub the bearing caps and journals with clean, warm buffer and reposition the Lash Adjusters in their initial positions after applying clean engine oil on them. Spread the moly-based engine assembly lubricant on the camshaft lobes and journals and pitch the exhaust camshafts featuring the dowel pins up. Next, spread RTV sealant on the sealing surfaces of the No. 1 bearing cap(s); also, it is crucial to fit new O-rings onto the second generation of the tensioning of the timing chain. Bolt in the bearing caps and tighten them by hand and then fix the bearing cap bolts, in accordance with the following torque pattern; step one, two, three. Verify the position of the front bearing caps and, depending on the cylinders, should come out to slightly less than 0.0055 inch behind the front face of the cylinder head. I was putting the camshaft sprockets and the timing chain on the car, and while tightening the bolts on the sprockets, I used a wrench to hold the camshaft in place. Reassemble the engine in the reverse order to the disassembly; ensure that if any of the valve train parts were replaced, to set valve clearances; the battery should be connected to perform several relearn procedures.
    Posted by NissanPartsDeal Specialist
    If you have any questions about this product, please don't hesitate to ask us. We will be happy to help you!

Genuine Nissan Part 13020-8J101, the Right Choice

To ensure reliability, purchase Nissan part # 13020-8J101 Camshaft Assembly. It can be referred to as Camshaft. The first option would be to use OEM parts. Designed by Nissan manufacturer and are produced with stringent factory specifications, undergoing the quality control procedures. This part fits 2003-2007 350Z, 2002-2006 Altima, 2001-2008 Maxima, 2003-2007 Murano.

NissanPartsDeal.com is a leading supplier of genuine Nissan parts and accessories, such as 130208J101 Camshaft Assembly. Welcome to our vast selection of competitively priced genuine Nissan parts available online. We provide each OEM part with a manufacturer's warranty and a straightforward return policy. Place your order now and receive your parts quickly, shipped directly to your doorstep.

Why choose Nissan Parts Deal

  • Dedicated Service

    Your complete satisfaction is our #1 goal

  • Lowest Prices

    Best deals on genuine OE parts from dealerships

  • Fast Delivery

    Orders are processed and delivered promptly