Contact Us: Live Chat or 1-888-726-6993
My Garage
My Account
My Cart
Make sure this part fits your vehicle

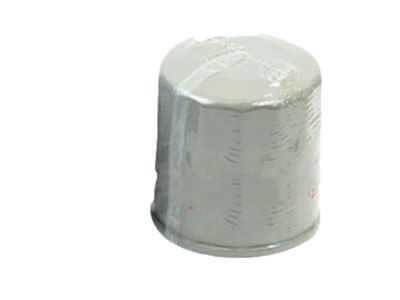
Nissan 15208-65F0A Oil Filter Assembly

2007-2019 Nissan 1520865F0A

Nissan 15208-65F0A Oil Filter Assembly
  • Part Description
    Filter Assy-Oil
  • Lookup Code
    15208
  • Replaced By
    15208-65F0E
  • Manufacturer
    Nissan
Customer Questions & Answers
$6.10 MSRP: $9.00
You Save: $2.90 (33%)
1
ADD TO CART
Ships in 1-3 Business Days
  • Product Specifications

    BrandGenuine Nissan
    Lookup Code15208
    Manufacturer Part Number15208-65F0A
    Part DescriptionFilter Assy-Oil
    Manufacturer NoteJPN
    Item Dimensions3.2 x 2.9 x 2.9 inches
    Item Weight0.90 Pounds
    ConditionNew
    Fitment TypeDirect Replacement
    ManufacturerNissan
    SKU15208-65F0A
    WarrantyThis genuine Nissan part is guaranteed by Nissan's factory warranty.
    Shipping & ReturnShipping Policy Return Policy
    Warning: California’s Proposition 65
  • Vehicle Fitment

    Year Make Model Trim & Engine Important vehicle option details
    2009-2014 Nissan Cube18, S, SL|4 Cyl 1.8LMR18DE
    2014-2015 Nissan JukeBase, Luxury, Nismo, S, SL, SV, Upper|4 Cyl 1.6LMR16DDT
    2013-2016 Nissan NVS, STD, SV|4 Cyl 2.0LMR20DE
    2018-2019, 2008-2015 Nissan RogueS, SL, SV|4 Cyl 2.0L, 4 Cyl 2.5LMR20DD, QR25DE
    2017-2019 Nissan Rogue SportS, SL, SV|4 Cyl 2.0LMR20DD
    2007-2012 Nissan Sentra20, SE-R, Spec V|4 Cyl 2.0L, 4 Cyl 2.5LMR20DE, QR25DE
    2007-2012 Nissan VersaBase, Entry, S, SL|4 Cyl 1.6L, 4 Cyl 1.8LHR16DE, MR18DE

Customer Questions & Answers

Q:
Will this part fit my car? Posted by NissanPartsDeal Specialist
A:
You can Select Your Vehicle to check if 15208-65F0A fits your vehicle.
Posted by NissanPartsDeal Specialist
Q:
Why are frequent oil and Oil Filter changes essential for preventive maintenance on Nissan Sentra? Posted by Customer
A:
Another advisable activity is regular oil change since over time the oil degrades in quality and becomes diluted and nourishes the engine with wear particles. Before doing anything else, make sure you have all of your supplies that you might need and plenty of old rags/newspaper for oiling. Leave the car in a flat surface, switch on its engine and rev it to normal operational temperatures and then switch off the engine. Chock the wheels and lift the car using jack stands and place a drain pan under the drain plug being careful of hot exhaust parts. Open the drain plug with a conventional socket wrench so you can let the previous oil get into the pan, while checking it for metal particles. Clean the locating pins and surrounding surface then replace the plug of the drain and tighten this with the needed torque. Place the drain pan beneath the next component, the oil filter, use the filter wrench and turn it with your hand, but you need to tilt it sometimes. Remove the wiping surface of the oil filter mounting surface so that no remnants of the old gasket can be seen and evaluate the old filter with the new one. Apply some engine oil on the gasket of the new filter, and then place the component by hand, and with the use of excessive force, and after that, ensure every tool, and rag is removed from under the automobile before lowering. Pour in four quarts of new oil with a funnel, wait for a few minutes, and then double check the level with the dipstick whether it's located at the H mark or not; if that's the case, replace the filler cap, start the engine, and let the fresh oil mix with the other components. Next, warm the engine up for approximately one minute and then switch it off; ensure that oil draining from the oil pan and the oil filter area is properly tightened if it seems to be leaking. Check the quantity of oil after a few minutes and add if the oil bit is still showing. After the oil change, the first few trips, it is advisable to constantly look out for stains and confirm oil dip stick levels. The old oil cannot be used again; figure out the procedures of recycling the oil with the nearby centers and take it in a proper receptacle container when it has cooled down.
Posted by NissanPartsDeal Specialist
Q:
Why are frequent oil and filter changes crucial for DIY owners on Diesel Nissan Juke? Posted by Customer
A:
As it has already been pointed out, proper periodic maintenance is an indispensable requirement of DIY deals, especially oil, and filter replacements, for the regularly used oil degenerates in stability and accumulates deposits in the engine, thus causing accelerated wear. At the beginning prepare all the equipment and materials that will be needed and there should always be ample rags and newspapers that can be used to mop up any spills. It is preferably to change the engine oil when it is still warm; this way, the oil is easy to drain and additional sludge is eliminated. Particular care should be taken not to touch the hot parts of the engines , always wear gloves while handling used oil, as it may cause skin reactions. When draining the contents of the vehicle is better done if the vehicle is raised on a lift, ramps or axle stands but the vehicle should be fixed in such away that the drain plug is at the bottom. Take off the oil filler cap and refer to the oil filler tube, which contains the dip stick. Turn the drainage plug counterclockwise and estimate the turn until it slightly unscrews, place a draining container underneath and then unscrew the last half turn of the plug while applying pressure on it and pressing it on the sump. Let the oil settle and, if the container was placed on top of the roaster, move it to the side or below the roaster. After it is drained, the drain plug should be cleaned, followed by removing the sealing washer and replacing it with a new one, cleaning the area around the plug and properly reinstalling it into the Holder with the washer and tightening to the recommended torque. The oil filter, which is situated in front of the cylinder block, is easiest to get at from above; place the container beneath the filter for any drips. Ot a wrench to 'nudge' on the filter hole and then by hand, turn the filter in a counter clockwise position to remove it, ensuring the open end up to prevent further spillage and /or spluttering, and finally, use the container to dispose off the oil. As a result, clean the sealing area of the engine while it is still fixable to make certain that the rubber sealing ring from the prior filter has not stuck. Cover the sealing ring of the new filter with engine oil, put it in the filter housing and tighten it with your hands. Pull out the old oil and the tools located under the car then reduce the height of the car to ground level. Add the correct grade and type of oil through the oil filler tube and use half the quantity of the amount specified, let it settle to the sump for about five minutes. Add more oil until the oil level reaches the dip stick bottom line; further another 1.0 L will help to reach the top line. Once the correct level of oil is established replace the oil filler cap. Switch on the engine and allow it to run for some time, this is to check for any kind of leakage around the oil filter seal and around the sump drain plug also the low oil pressure lamp may take some few seconds to cease. Engine should not be operated at or above idle speed when the warning light is activated. Switch off the engine and let the oil to settle down for about five to ten minutes before checking the dipstick level and subsequently adding more oil if needed. Ensure the used engine oil is disposed in the appropriate way, as it is rather dangerous to put the old filter in the household waste bin, as many local council recycling services offer oily waste disposal facilities along with filter collection points.
Posted by NissanPartsDeal Specialist
Q:
What should you do with the drain plug for the 2020 Nissan Rogue? Posted by Customer
A:
Remove the drain plug with the appropriate wrench, allowing the old oil to drain while inspecting it for metal shavings.
Posted by NissanPartsDeal Specialist
See expert answers on similar Oil Filter
Q:
What preparations should be made before starting an oil change for the 2014 Nissan Versa? Posted by Customer
A:
Before starting, ensure you have all necessary tools and plenty of rags or newspapers for spills.
Posted by NissanPartsDeal Specialist
See expert answers on similar Oil Filter
Q:
What should you do after removing all tools and old oil from under the 2013 Nissan Juke? Posted by Customer
A:
Lower the vehicle and fill the engine with the correct grade and type of oil, checking the dipstick level as you go.
Posted by NissanPartsDeal Specialist
Q:
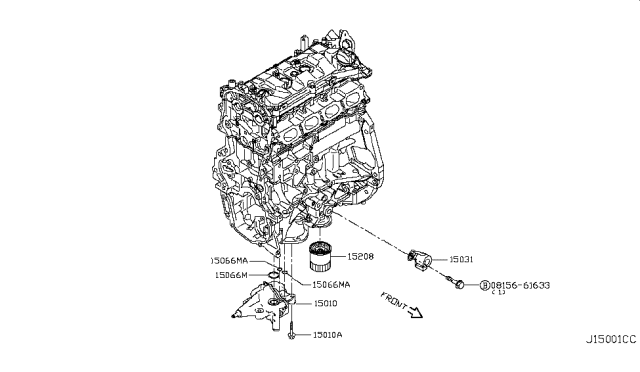
Does it come with the O ring? Can you confirm it has been superseded to 15208-65F0E? Posted by Customer: 2012 Nissan Rogue
A:
it does not come with the o-ring and it does supercede to 1520865f0e
Posted by NissanPartsDeal Specialist 20/9/2016
If you have any questions about this product, please don't hesitate to ask us. We will be happy to help you!

Genuine Nissan Part 15208-65F0A, the Right Choice

To ensure reliability, purchase Nissan part # 15208-65F0A Oil Filter Assembly. It is sometimes referred to as Nissan Oil Filter. OEM parts are the #1 choice in terms of quality. Crafted by Nissan, they follow rigorous factory specs and go through the demanding quality control processes during manufacturing. This part fits 2014-2015 Nissan Juke, 2008-2019 Nissan Rogue, 2007-2012 Nissan Sentra, 2007-2012 Nissan Versa.

NissanPartsDeal.com is a leading supplier of genuine Nissan parts and accessories such as Nissan 1520865F0A Oil Filter Assembly. Welcome to our vast selection of competitively-priced genuine Nissan parts available online. Each OEM Nissan part we provide is backed by a manufacturer's warranty and is subject to a stress-free return policy. Place your order now and receive your parts quickly, shipped directly to your doorstep.

Why choose Nissan Parts Deal

  • Dedicated Service

    Your complete satisfaction is our #1 goal

  • Lowest Prices

    Best deals on genuine OE parts from dealerships

  • Fast Delivery

    Orders are processed and delivered promptly