Contact Us: Live Chat or 1-888-726-6993
My Garage
My Account
My Cart
Make sure this part fits your vehicle

Nissan 13231-JA12C Lifter-Valve

2007-2015 Nissan 13231JA12C

Nissan 13231-JA12C Lifter-Valve
  • Part Description
    Lifter-Valve
  • Lookup Code
    13231+A
  • Replaced By
    13231-EY02C
  • Manufacturer
    Nissan
Customer Questions & Answers
$52.84 MSRP: $70.45
You Save: $17.61 (25%)
1
ADD TO CART
Ships in 1-3 Business Days
  • Product Specifications

    BrandGenuine Nissan
    Lookup Code13231+A
    Manufacturer Part Number13231-JA12C
    Part DescriptionLifter-Valve
    Item Dimensions1.9 x 1.9 x 0.9 inches
    Item Weight0.40 Pounds
    ConditionNew
    Fitment TypeDirect Replacement
    ManufacturerNissan
    SKU13231-JA12C
    WarrantyThis genuine Nissan part is guaranteed by Nissan's factory warranty.
    Shipping & ReturnShipping Policy Return Policy
    Warning: California’s Proposition 65
  • Vehicle Fitment

    Year Make Model Trim & Engine Important vehicle option details
    2007-2015 Nissan AltimaBase, Hybrid, S, SE, SL, SR, SV, Tech|4 Cyl 2.5L, 6 Cyl 3.5LQR25DE, VQ35DE
    2009-2014 Nissan MaximaLE, Premium, S, Sport, SR, SV|6 Cyl 3.5LVQ35DE
    2013-2015 Nissan PathfinderPlatinum, S, SL, SV|6 Cyl 3.5LVQ35DE
    2007-2012 Nissan SentraSE-R, Spec V|4 Cyl 2.5LQR25DE
    2013-2015 Nissan XterraBase Camp, Off-Road, PRO-4X, S, X|6 Cyl 4.0LVQ40DE

Customer Questions & Answers

Q:
Will this part fit my car? Posted by NissanPartsDeal Specialist
A:
You can Select Your Vehicle to check if 13231-JA12C fits your vehicle.
Posted by NissanPartsDeal Specialist
Q:
How to remove, inspect, and reinstall camshafts, timing chains, and Lash Adjuster on Nissan Sentra? Posted by Customer
A:
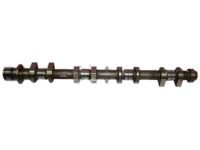
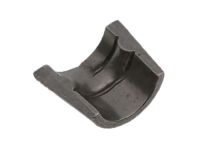
Disconnect the cable from the negative terminal of the battery. Remove the valve cover and check the valve clearances, recording the measurements; if any valves are out of specification, they can be corrected before reinstalling the camshafts. For 2.0L engines, remove the timing chain cover and Camshaft Position (CMP) sensor, while for 2.5L engines, disconnect the electrical connectors from the Intake Valve Timing (IVT) control solenoid and the CMP sensor. Remove the IVT/camshaft sprocket cover bolts in reverse of the tightening sequence and take off the cover, using a sharp tool to cut the RTV sealant securing it. Remove the CMP sensor and its bracket. Loosen the right front wheel lug nuts, raise the vehicle securely on jackstands, and remove the right front wheel. Remove the inner fender splash shield. Position the engine at TDC on the compression stroke for the number one cylinder, marking the links of the timing chain that correspond to the timing marks on the camshaft sprockets, ensuring not to turn the camshaft(s) or crankshaft afterward to avoid valve damage. Use a screwdriver to retract the plunger of the chain tensioner, securing it with a drill bit or Allen wrench, and then remove the tensioner. Hold the hexagon part of the camshaft with a wrench and remove the camshaft sprocket bolts, then take off the sprockets. For 2.5L engines, remove the upper timing chain guide through the timing chain cover. Before removing the camshafts, check camshaft endplay with a dial indicator, ensuring the total movement does not exceed the limit; if it does, replace the camshaft or cylinder head. Loosen the camshaft bearing caps in reverse of the tightening sequence, carefully prying up the bridge on 2.0L engines while keeping the caps in order for reinstallation. Remove the bearing caps or bridge and lift the camshafts straight up and out, then pull the Lash Adjusters straight up and store them in numbered plastic bags or a marked box. Visually examine the camshaft lobes, journals, bearing caps, and Lash Adjusters for any signs of wear or damage, and measure camshaft journal diameter and lobe height with a micrometer, replacing any worn components. Check the oil clearance for each camshaft journal by cleaning the bearing caps and journals, laying the camshafts in place without lubrication, placing a strip of Plastigage on each journal, installing the bearing caps, and tightening the bolts in sequence. After removing the bolts and bearing caps, compare the width of the crushed Plastigage to the scale on the envelope, replacing components if the clearance exceeds specifications. Scrape off the Plastigage carefully to avoid damaging the journals or bearing caps. Apply moly-based engine assembly lubricant to the camshaft lobes and journals, then install the camshafts in their original positions at TDC, ensuring the dowel pins are correctly oriented. Apply a 1/8-inch bead of RTV sealant to the mating surface of the camshaft bridge for 2.0L engines, install the bearing cap bridge and bolts, and tighten them in sequence. For 2.5L engines, apply RTV sealant to the timing chain cover mating surface, install the bearing caps and bolts, and tighten them in sequence, being careful not to disturb the sealant when installing the no. 1 bearing cap. Install the camshaft sprockets and timing chain, aligning the marks made earlier with the timing marks on the sprockets. Complete the installation in reverse order of removal, checking and adjusting the valve clearance if any part of the valve train was replaced, then reconnect the battery and perform the necessary re-learn procedures.
Posted by NissanPartsDeal Specialist
Q:
How do you remove and reinstall the engine components, including the Lash Adjuster, camshafts, and timing chain on 4 cylinder Nissan Altima? Posted by Customer
A:
To remove the components, the communication cable is disconnected from the negative terminal of the battery, followed by the removal of the valve cover with the check of the valve clearances; the measurements are to be taken for the valves having deviations from the standard ones. Pull the Intake Valve Timing electrical connectors from the Intake Valve Timing control solenoid and Camshaft Position sensor-unscrew the IVT/camshaft sprocket cover bolts and remove the cover turning the feed VTG, then use the sharp tool to sever the RTV sealant. Then, the CMP sensor and its bracket must be taken out; the right front wheel's lug nuts must be loosened and the car has to be raised securely only on the jackstands and the wheel has to be taken off. Remove the inner fender splash shield and install the engine at TDC of the compression stroke of the number one cylinder aligning the marks on the timing chain links which are in relation with the timing marks on the camshaft sprockets. It is advised that camshaft or crankshaft should not be turned after making the said marks. With the help of screwdriver pull the tail of the plunger of the chain tensioner, lock it by a drill or Allen key, and then take out the tensioner. Having the hexagon part of the camshaft tighten with a wrench to take out the camshaft sprocket bolts and sprockets, and the upper timing chain cover by taking out the timing chain guide. It is recommended to inspect the camshaft end play with a dial indicator before the camshafts are pulled out and the bearing caps are off. Remove all the camshafts vertically up and out and pull the Lash Adjusters straight up, and put them in the corresponding number bags or better still in a box with numbers for identification. In the same manner, with regard to the camshaft, look at the camshaft lobes, journals, bearing caps, and Lash Adjusters for signs of wear or damage and measure the camshaft journal diameter using a micrometer and the lobe height. The camshaft journals should now be checked for oil clearance by using Plastigage, and the bearing caps and journals should be cleaned before proceeding, the width of the crushed Plastigage should now be matched with the scale. Before reassembling the camshafts, clean the Plastigage off the journal and lubricate the camshaft lobes and journals heavily with moly-based engine assembly lubricant after that you can reinstall the camshafts in their former positions at T.D.C while making sure that the dowel pins are well aligned. Squeeze a little RTV sealant on the timing chain cover mating surface, then put on the bearing caps and the bolts and tighten them in a ; pattern. The camshaft sprockets and the timing chain must be then installed with the timing chain links on the specified positions of the camshaft sprockets that were marked earlier. Continue with the removal process in reverse order to complete the installation, if any part of the valve train was touched, follow the clearance check on the valve; reconnect the battery and do the re-learn process where necessary.
Posted by NissanPartsDeal Specialist
Q:
How should the camshafts be marked for reinstallation for the 2010 Nissan Altima? Posted by Customer
A:
Mark each camshaft for correct reinstallation and label the camshaft bearing caps from 1 to 4, indicating intake or exhaust with an "I" or "E," and mark arrows to show the front of the engine.
Posted by NissanPartsDeal Specialist
If you have any questions about this product, please don't hesitate to ask us. We will be happy to help you!

Genuine Nissan Part 13231-JA12C, the Right Choice

To ensure reliability, purchase Nissan part # 13231-JA12C Lifter-Valve. It is sometimes referred to as Nissan Lash Adjuster. OEM parts are the #1 choice in terms of quality. Crafted by Nissan, they follow rigorous factory specs and go through the demanding quality control processes during manufacturing. This part fits 2007-2015 Nissan Altima, 2009-2014 Nissan Maxima, 2013-2015 Nissan Pathfinder, 2007-2012 Nissan Sentra.

NissanPartsDeal.com is a leading supplier of genuine Nissan parts and accessories such as Nissan 13231JA12C Lifter-Valve. Welcome to our vast selection of competitively-priced genuine Nissan parts available online. Each OEM Nissan part we provide is backed by a manufacturer's warranty and is subject to a stress-free return policy. Place your order now and receive your parts quickly, shipped directly to your doorstep.

Why choose Nissan Parts Deal

  • Dedicated Service

    Your complete satisfaction is our #1 goal

  • Lowest Prices

    Best deals on genuine OE parts from dealerships

  • Fast Delivery

    Orders are processed and delivered promptly