Contact Us: Live Chat or 1-888-726-6993
My Garage
My Account
My Cart
Make sure this part fits your vehicle

Nissan 31390-41X07 Pan Oil

1987-2004 Nissan 3139041X07

Nissan 31390-41X07 Pan Oil
  • Part Description
    Pan Assy-Oil
  • Lookup Code
    31390
  • Replaces
    31390-41X08, 31391-41X01, 31390-41X01
  • Manufacturer
    Nissan
Customer Questions & Answers
$74.75 MSRP: $99.67
You Save: $24.92 (26%)
1
ADD TO CART
Ships in 1-2 Business Days
  • Product Specifications

    BrandGenuine Nissan
    Lookup Code31390
    Manufacturer Part Number31390-41X07
    Part DescriptionPan Assy-Oil
    Other NamesTransmission Pan
    Item Dimensions14.8 x 11.7 x 9.9 inches
    Item Weight5.20 Pounds
    ConditionNew
    Fitment TypeDirect Replacement
    Replaces31390-41X08, 31391-41X01, 31390-41X01
    ManufacturerNissan
    SKU31390-41X07
    WarrantyThis genuine Nissan part is guaranteed by Nissan's factory warranty.
    Shipping & ReturnShipping Policy Return Policy
    Warning: California’s Proposition 65
  • Vehicle Fitment

    Year Make Model Trim & Engine Important vehicle option details
    1998-2004 Nissan FrontierSC, SE, XE|6 Cyl 3.3LVG33E
    1987-1994 Nissan Hardbody Pickup (D21)DX, GST, ST|6 Cyl 3.0LVG30, VG30E
    1995-1997 Nissan Hardbody Pickup (D21U)Long Body SE|6 Cyl 3.0LVG30E
    1987-2004 Nissan PathfinderLE, SE, ST, XE|6 Cyl 3.0L, 6 Cyl 3.3L, 6 Cyl 3.5LVG30E, VG30I, VG33E, VQ35DE
    2000-2004 Nissan XterraSE, XE|6 Cyl 3.3LVG33E, VG33ER

Customer Questions & Answers

Q:
I want to make sure this part fits my car Posted by NissanPartsDeal Specialist
A:
You can Select Your Vehicle to check if 31390-41X07 fits your vehicle.
Posted by NissanPartsDeal Specialist
Q:
How to remove and install an oil pan on 2.4L four cylinder Nissan Pathfinder? Posted by Customer
A:
Disconnect the cable from the negative terminal of the battery. Raise the vehicle and support it securely on jackstands. Remove the engine under-cover if equipped. Drain the engine oil and remove the oil filter. Unbolt and remove front exhaust pipe from the exhaust system. Detach the bellhousing cover. On 2WD models, remove the front suspension crossmember from beneath the oil pan. On 4WD models, remove the front axle/differential assembly. Remove the oil pan bolts, following the reverse of the tightening sequence. Detach the oil pan. Don't pry between the pan and engine block or damage to the sealing surfaces may result and oil leaks could develop. If the pan is stuck, dislodge it with a soft-face hammer. Use a gasket scraper to remove all traces of old gasket material and sealant from the engine block and pan. Clean the mating surfaces with lacquer thinner or acetone. Ensure that the threaded holes in the engine block are clean. Apply a continuous 5/32-inch (3.5 mm) bead of RTV sealant to the inner sealing surface of the oil pan. Install the oil pan and tighten the bolts in three or four steps following the sequence to the specific torque. The remaining installation steps are the reverse of removal. Allow at least 30 minutes for the sealant to dry, add oil and a new oil filter, start the engine and check for oil pressure and leaks.
Posted by NissanPartsDeal Specialist
Q:
How to remove an oil pan on 3.5L V6 Nissan Xterra? Posted by Customer
A:
To start the removal process first remove the battery cable, pull on the emergency brakes and secure the rear wheels. Lift up the front of the vehicle and support it with jackstands in order to get rid of all engine splash shields if any. Proceed to drain the engine oil and remove the oil filter. Unplug the exhaust pipe in front, cut out catalytic converter heat shields and take off starter motor. Get rid of suspension crossmember brace and on 4WD models, detach front differential by unbolting front driveaxles without disconnecting them from steering knuckles. Then remove engine drivebelts and lower idler pulley bracket followed by alternator and power steering pump. Make sure that power steering pump bracket is also removed. Remove crankshaft position sensors from front timing chain cover and transmission bellhousing. For vehicles with automatic transmissions, disconnect transmission lines at oil pan and hoses from engine oil cooler. Disconnect electrical connector from oil pressure switch, loosen lower pinch bolt at steering gear box assembly under dash support (console) tower mounting location. Support engine/transmission from above using a hoist or engine support fixture then remove lower engine mount retaining nuts. Lower suspension crossmember brace and steering gear to provide clearance for oil pan removal.Also move automatic transmission's lines aside- if any.In addition remove upper steel pan from lower aluminum half of oil pan being careful not to gouge sealing surfaces.Remove transmission mounting bolts from upper aluminum half of oil pan as well as bolts attaching upper aluminum half to block working from ends toward center in reverse order of tightening sequence to avoid warping.Carefully insert flathead screwdriver or pry bar into provided notch on side of oil pan so as not to damage sealing surfaces thus loosening aluminum section of oil pan.Use scraper to remove any old gasket material/sealant remains on upper aluminum half of oil pan, lower steel half of it, and engine block; clean mating surfaces with lacquer thinner or acetone. Ensure that the block and aluminum section of the oil pan's threaded bolt holes are clean.Apply bead of ATV around ends of front timing cover gasket & rear oil seal retainer gasket then place these gaskets in position on oil pan.Apply a bead of ATV sealant around upper aluminum oil pan flange.The oil pan must be installed within 15 minutes after applying the sealant.Place upper aluminum section of oil pan on engine block and install bolts, tightening them in three to four steps following recommended sequence to specified torque. Install transmission mounting bolts.Examine lower steel oil pan flange for any distortion especially around bolt holes and if necessary flatten it.Apply bead of RTV around steel oil pan flange then install steel oil pan.Like before, the oil pan must be installed within 15 minutes after applying the sealant.Tighten fasteners in several steps following recommended sequence to specified torque.Reverse removal steps remembering to install a new filter and waiting at least one hour before adding any oil.
Posted by NissanPartsDeal Specialist
Q:
What components need to be disconnected or removed from the 1998 Nissan Pathfinder undercarriage? Posted by Customer
A:
You should disconnect the front exhaust pipe, remove catalytic converter heat shields, and take out the starter motor. Additionally, eliminate the suspension crossmember brace, and on 4WD models, remove the front differential by detaching the front driveaxles without disconnecting them from the steering knuckles.
Posted by NissanPartsDeal Specialist
Q:
How should the surfaces be prepared before reinstallation for the 2004 Nissan Pathfinder? Posted by Customer
A:
Use a gasket scraper to remove all traces of old gasket material and sealant from the engine block and pan. Clean the mating surfaces with lacquer thinner or acetone. Ensure that the threaded holes in the engine block are clean.
Posted by NissanPartsDeal Specialist
Q:
How is the oil pan removed from the engine for the 2001 Nissan Xterra? Posted by Customer
A:
Remove the oil pan bolts, following the reverse of the tightening sequence. Detach the oil pan. Don't pry between the pan and engine block or damage to the sealing surfaces may result and oil leaks could develop. If the pan is stuck, dislodge it with a soft-face hammer.
Posted by NissanPartsDeal Specialist
Q:
What are the final steps in this procedure for the 2002 Nissan Xterra? Posted by Customer
A:
The remaining installation steps are the reverse of removal. Allow at least 30 minutes for the sealant to dry, add oil and a new oil filter, start the engine, and check for oil pressure and leaks.
Posted by NissanPartsDeal Specialist
Q:
How is the oil pan reinstalled and sealed for the 2001 Nissan Frontier? Posted by Customer
A:
Apply a continuous 5/32-inch (3.5 mm) bead of RTV sealant to the inner sealing surface of the oil pan. Install the oil pan and tighten the bolts in three or four steps following the sequence to the specific torque.
Posted by NissanPartsDeal Specialist
Q:
What preparations should be made before installing the oil pan back onto the engine for the 2004 Nissan Frontier? Posted by Customer
A:
Before installation, use a scraper to eliminate all old gasket material and sealant from the upper aluminum section of the oil pan, the lower steel pan, and the engine block. Clean the mating surfaces with lacquer thinner or acetone and ensure the threaded bolt holes in the block and aluminum section of the oil pan are clean.
Posted by NissanPartsDeal Specialist
See expert answers on similar Oil Pan
Q:
What are the final steps in this procedure for the 1998 Nissan Frontier? Posted by Customer
A:
The remaining installation steps are the reverse of removal. Allow at least 30 minutes for the sealant to dry, add oil and a new oil filter, start the engine, and check for oil pressure and leaks.
Posted by NissanPartsDeal Specialist
If you have any questions about this product, please don't hesitate to ask us. We will be happy to help you!

Genuine Nissan Part 31390-41X07, the Right Choice

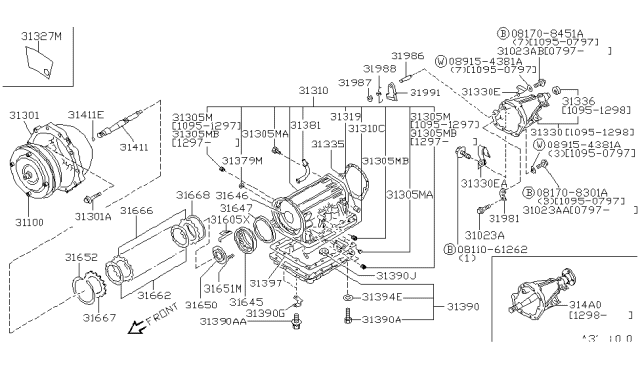
To ensure reliability, purchase Nissan part # 31390-41X07 Pan Oil. It is sometimes referred to as Nissan Oil Pan, Nissan Transmission Pan. OEM parts are the #1 choice in terms of quality. Crafted by Nissan, they follow rigorous factory specs and go through the demanding quality control processes during manufacturing. This part fits 1998-2004 Nissan Frontier, 1987-1994 Nissan Hardbody Pickup (D21), 1987-2004 Nissan Pathfinder, 2000-2004 Nissan Xterra.

NissanPartsDeal.com is a leading supplier of genuine Nissan parts and accessories such as Nissan 3139041X07 Pan Oil. Welcome to our vast selection of competitively-priced genuine Nissan parts available online. Each OEM Nissan part we provide is backed by a manufacturer's warranty and is subject to a stress-free return policy. Place your order now and receive your parts quickly, shipped directly to your doorstep.

Why choose Nissan Parts Deal

  • Dedicated Service

    Your complete satisfaction is our #1 goal

  • Lowest Prices

    Best deals on genuine OE parts from dealerships

  • Fast Delivery

    Orders are processed and delivered promptly